Saturday, May 17, 2025

Budget and timelines

 This post was one that I have been WAITING to share... and I am NOT Patient! Pricing... 

When we started into this journey, we met with several builders, looked through THOUSANDS of floor plans and after lots of discussion, we decided to just try and build it ourselves.  We ran into alot of obstacles but kept pushing.  We just felt like us DIY was the only option to get the house we wanted and needed with the price we were able to afford.  So this post may be a long one, but just be patient! 

First, when we were meeting with builders we were told various pricing... We were told $180 per sq ft was the going rate.  We were told we could get it down to $165 roughly if we made some changes to the interior.   And we were OK with stepping some of the luxury down knowing that some of those decisions could very easily be updated later on down the road. But $165-$180 was what we got back as being the lowest for a new build.  

We then decided to ask about Barndominiums.  There were mixed results ALL OVER.  Some say that the barndo didn't save ANYTHING.  Some said more expensive.  Some said WAY LESS but that was before COVID.  We couldn't find anything current.  When I started lookin at all the numbers, breakdown, etc the numbers didn't make sense... Then we ran into a friend who had just built a Barndo and he confirmed my thoughts on all the numbers.  Barndominiums CAN be less.  He had just done it! This gave me the confidence in my crunching that we could too.  I started getting quotes, looking at other builds, paying attention to the financial breakdowns of the quotes we were given on the OTHER areas of the build like electric and plumbing etc. and came up with our starting budget... THE GOAL = to stay under $100/sq ft... 

YES, that is NOT a typo.  I wanted to build the house for under $100/sq ft.  

The next step was seeing how much we wanted to be involved.  We contacted a Barndo Builder and he told us $200/sq ft.  I am a very outspoken person... and I kept quiet for a few minutes while I let him finish the speel.  Then I looked him in the eyes and asked "I already got a quote for the Foundation, the metal exterior, the metal roofing and for our house, all of that comes out to $185,000... You're telling me that it would take another MILLION DOLLARS to finish out the interior?"  He responded with "that's what the going rate is".  Needless to say, we left after thanking him for his time and when we got into the car, I looked at Corbin and said "We can do this... Im scared, but we can do this.  Do you trust me?".  Since then, we never looked back.  

In the state of Oklahoma, you do not need a General Contractors License.  So our name went down as the GCs and we started this journey.  We know several trade specialists and we had several friends say that they would help us out by sharing contacts etc.  So we began! 

We ran into some issues when trying to find a bank that would allow us to do the build ourselves and this put us behind schedule.  Our house had already sold and we needed a rental, but didn't want to sign on to any more than 6 months.  We even thought about living on the property in a camper!!! After about 5 breakdowns and thinking we were going to be homeless for awhile, we found a VERY SMALL rental... Move out date would have to be December 10th.  Now the time was ticking and the pressure was on.  

THIS was the part that we were told we were crazy on... Our timeline.  But if anyone knows me, you know that I am not patient and spreadsheets are my love language.  I prepared a spreadsheet calendar that showed that we could complete the build in 4 months so we stuck with that.  This was the BIBLE for the next several months... If you were one of the subs that worked on our house, you KNOW this was true LOL... 

GROUND BREAKING:  SO, we got the construction loan 4 weeks later than we wanted and we were finally able to break ground! We broke ground August 13th, 2024.  

The metal barn contractor put the shop us so fast (3 days) that we were SO EXCITED about the timeline and felt on top of the world! BUTTTT the house took WAYYY LONGER THAN THAT.  We were told alot of different excuses and this REALLY messed up our timeline, however, the end result was great.  The stress of having to move all other subcontractors - that I already had scheduled out - was the stressful part.  Before we broke ground, I made sure all subs that we were going to use, already had our build on their calendar.  Even if it was a tentative date.  My favorite response was from our plumber who is awesome.  He told me that if construction ever figures out to have working mothers be the managers, that the world would be a completely different place with everything color coordinated.  I laughed HARD at that one.  

Without sharing EVERY detail, we were able to wrap up the build and had a line of football players and their trucks down the road ready to help move stuff in the day after the state championship game.  We got the Certificate of Occupancy at 11AM and by 11:15AM we had our couches in the living room.  This was December 7th, 2024... We were able to move in 117 days after breaking ground.  

And the moment you all have been waiting for... we were also able to complete our build at $107.32 per square foot.  43K over budget, but for two people who had never done this before I would say that is pretty dang good.  

We wanted to share this journey in hopes that we can help others who have wanted to do the same thing as us but on a budget.  I will continue to share on the choices we made, but overall we absolutely LOVE our house and when people hear the bottom line and see my spreadsheets, they are baffled.  I hope you are enjoying the follow along as much as we are enjoying sharing it! 

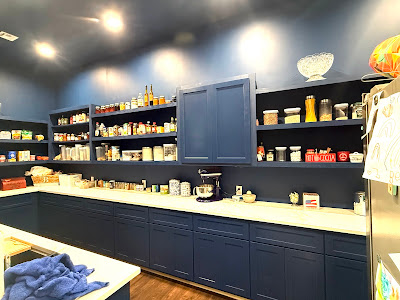
PANTRY!

 One of the rooms that I always told Corbin that I needed more room in was the Pantry.  I cook ALOT... We already knew we wanted to do the double stove to give us more cook top space and oven space, but we also looked at how to get the laundry room bigger and the pantry bigger.  So when we were designing the house and finalizing the floorpan, we made sure that we maximized our interior space.  We eliminated any hallways we could, and cut out any jet outs on the exterior.  This saved on material AND gave us more space.  This pantry is one of my favorite feature in the house.  

We went ahead and decided to do all lower cabinets all the way around and put our standing deep freezer from the old house as well as our old fridge in here giving us a total of three fridges.  We also added its own sink and dishwasher in here which has been AMAZING for when we have guests over and need to hide the last minute prep dishes.  

Now that I have finished painting the pantry, here is the final result! Corbin actually took on all the painting of the cabinets and we got the cabinet pulls from amazon for super cheap, but I LOVE the look of how big they are! 


Not that anyone has noticed, but we did opt to do the regular thickness in here instead of paying extra for the mitered edge on the countertop.  I think this savings was a smart one! We still got the countertop, but saved too! 


The good, the bad, the ugly

 I entered this blog journey and wanted to share it all. Even when things didn’t go our way. This is one of those times! 

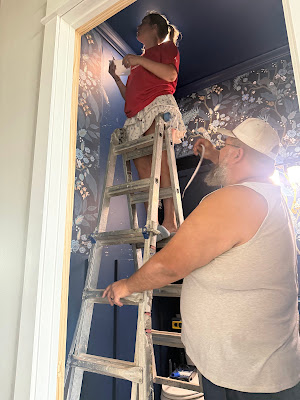
 As we are slowly able to add more personality to the house, we have come across some new materials and techniques that I’m willing to try. The peel and stick backsplash worked WONDERS and so I decided to try the peel and stick wallpaper! Well, the peel part is the key!!! 

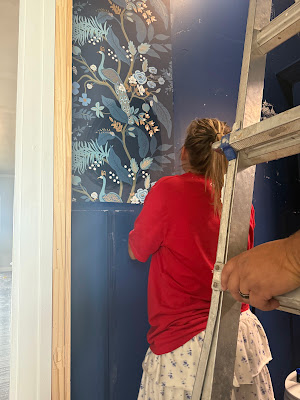
After this came down two hours after putting it up, I ordered actual wallpaper. I have never installed wallpaper before but I followed all instructions and even made sure that the smooth surface walls had been primed etc. all the things!!! But NOPE! The peel and stick still sucked. So rip down the $80 Worth of peel and stick and ordered the $350 wallpaper from rifle wallpaper. 


I waited for the rifle wallpaper to get in and watched many what NOT to dos. Installed it by rolling the glue to the wall and then putting the wallpaper up. I found the ACTUAL WALLPAPER to be EASIER than the peel and stick! 

End result, $80 was wasted on crappy wallpaper but now my half bath in the front looks amazing! Just need to change out all my stuff to gold! 


The end result! Now I need to put my runners back on and finish the paint! 


Wednesday, March 19, 2025

FINALLY AN UPDATE!

 It’s been awhile since I last shared due to sports and life and everything else. We have been working hard to slowly finish up projects as we go and we set a deadline of 30 days on ourselves to completely wrap up!!! 

So this post is about the kitchen. Our number one goal throughout this entire process was to try and save as much money as possible. We really wanted to still stay luxurious but on a beer budget. Here’s a couple things we did. 

Oven. Instead of a commercial oven that is 6k-12k, but still having the cook space that I DESPERATELY needed, we went with two ovens side by side. We also snagged these during Lowe’s Labor Day sale and locked in the price and pushed delivery out in order to get the deals we did. So for the ovens, we paid $759/oven. We get two ovens, self cleaning, two stove tops, and all the space we need. It even has an air fry selection which I have not learned how to use yet! 

We did the same with the fridges, $590 per fridge and I swapped the swing on one of the doors so that it looks just like a commercial fridge. So instead of paying 3k - 5k, we paid $1180. 


Another cool story is the backsplash. I went to floor and decor with blue tile as my mission. But when I saw that it wasn’t the exact color I wanted, I looked around and found a different PERFECT BLUE. However, it was almost $14/sq ft… which would have been $580 without extra for waste. So I decided to go down the clearance isle and found the tile we chose. It was originally $9.95 per sq ft and it was 75% off! We needed 41 sq ft and they had 45 left. The associate there said if I took the whole stock, he’d knock another 5% off. So I’m loading it all up saying “it’s a deal” until he said, “you know this is peel and stick right?” Seeing my bag of mortar… I have NEVER tiled with peel and stick before and this was true tile pieces so it surprised me that it was peel and stick. So I googled “what not to do when installing peel and stick” and put the mortar back and went to checkout… $86… that’s all it cost! Plus a very expensive spray can of 3m spray adhesive because I’m paranoid. Well, when installing this, I had a piece that didn’t fit right and I tried to peel it off to fix. The Sheetrock came with it! So this tile isn’t going ANYWHERE ANYTIME SOON. And it looks amazing!!! 


Cabinet Hardware.  This is one of the things we just had to do ourselves.  It is time consuming, but Corbin bought a cabinet hardware jig for $50 and it has been a LIFESAVER.  The trim guys could have done this part but usually charged $1500 for cabinet hardware and door handles, so we opted to DIY.  He did a GREAT job getting everything straight and it looks sooo good.  We actually found the hardware on Amazon for $52.99 per 20 pulls.  I have always loved the look of the big clean looking pulls for a kitchen, so that was also a huge cost savings. 

I’ll share more about the kitchen including the bar size when we finish painting that. Hope you’re enjoying our process! 


Friday, January 10, 2025

Master bath update!!!

 Well we finally moved in and we took the Christmas break to just settle. Still a TON of painting to do, BUT WE DID IT! We made the deadline with the help of several friends and favors called. I am hoping to share some fun features as we go, but the hot topic that everyone wants to see when they come over is the master shower! We are still not done. We need to paint the cabinets, trim, doors and the toilet room, but here are some cool updates. All the trim will stay a white color (Swiss coffee) and the  cabinets will all be the dark grey like the walls. We wanted to go for bold and can’t WAIT to see the result once the cabinets are painted too! 


The view from the toilet room (above)


We went with a smoky grey blue tile for the vanity wall to give it some contrast and tied it in to the shower niche as well. 


Sunday, December 1, 2024

More water and a ruined gravel drive


Well, we had the 6th wettest month in Oklahoma history… over 12 inches of rain and the good news is none in the house!!! Bad news, everyone is getting stuck because when you have a wet gravel road that is new, and 80k pound concrete trucks come through and GET STUCK then you have a messed up driveway… 

The sod will help even more come spring, but this is our sidewalk coming around the backside of the house! 

Our driveway is beautiful!!! 


Corbs truck…

Our flooring crew getting him out. 🙄

Had to fire our countertop company and hire another. Our new countertop company came out to measure and had a 2x4x4 go through his grill when he tried to floor it over the ruts in the driveway… 🫣


You get stuck, and you get stuck… I feel like Oprah handing out passes on getting stuck in the mud… 


Saturday, November 23, 2024

Paint until my shoulders fall off!

 Painting ceilings is my LEAST favorite job… let alone 11.5 foot tall ceilings. However, we let each of the kids pick their color and their eyes LIT UP when they saw their colors come to life! Now it’s the race to paint all the ceilings before the laminate goes it!! 


Trim guys are working at the same time as us painting so they are leaving as I’m coming in with the kids. The trim looks SO GOOD though. Saved a TON by going to Kla-Mart in Pryor and snagged each 16ft piece for $12 instead of the $42 it is at Lowe’s 

We went with the underpayment for the laminate even though our laminate has the built in cork underneath. This is to help with echoing and the feel of the hollow floor you get with laminate planks sometimes. This made a HUGE difference in my opinion. We have had several friends who are in love with the flooring we picked out and we’re shocked that it was laminate and not real wood. The price difference is crazy too. I’ll share more about this in a later post. 


The theater room got carpet!!! It’s SO SOFT! 

Finished the living room ceiling! We went with eggshell but may switch to flat for the ceiling because it is picking up a difference in the sheen… even though we primed everything. 


My little helper snagged some pizza in between paint sessions!!! 

Saturday, November 16, 2024

Favors called!

The second the drywall was up, we snagged cabinets and out them in the house from the shop to get the shop cleared out in order to have our son’s birthday party there. We were supposed to have it in the house, but with all the delays we are having to have it in the shop. We wouldn’t have been able to make this happen without calling in some favors. It was at this point that I thought the phrase “you can never have enough cabinets” might be untrue. Now that they are all in place though, it all looks good, but the pile of cabinets before placing them was daunting to say the least. PROGRESS!!!! 

Butlers pantry… sooooo many cabinets… 


Our cabinet helpers!!!! I owe them a good home cooked meal for SURE! And yes, JC felt short so he stood on a chair so he was the same height as Corb and Judge 🤣


Saturday, November 9, 2024

Drywall!!!

  This week consisted of a lot of drywall and also the prep for the concrete to be poured. The drywall is definitely making the house look more like a home and the rooms look like we could live here soon which is good considering we have to be out of our rent house by December 10th! We are in crunch time.


Harvey finished the tile accent wall in the master bathroom. 

The backyard looks soooo much better with the grading! 


Hidden storm shelter coming out of the master closet. We changed the entrance to this from the garage to the master and are putting a bookshelf door here so it’s hidden. 

The shop is about to have electric!!! We have done all the work prior to this off generators!!! 

This is where the driveway will go. Big driveway for the kids to play on. 

The garage view and the bump out is the storm shelter, but the garage is still big enough to put both vehicles in. Both sides are a full double garage door. 

Hallway coming from garage. 


Our front door we splurged on. It’s a 10ft tall by 4ft wide door. 


Intro

Intro to the Burch Barndo

  The Burchett Barndo Hello!  We are the Burchett Family and we are building a Barndominium!  Just a little about us, Corbin and I (Courtney...